Summary of Contents for 4B Touchswitch
- Page 1 Touchswitch ™ BELT MISALIGNMENT SENSOR U.S. Patent #6,731,219 Other Patents Pending INSTALLATION INSTRUCTIONS OPERATION MANUAL BELT MISALIGNMENT SENSOR - PART NO. TS2V34AI www.go4b.com...
-
Page 3: Table Of Contents
TABLE OF CONTENTS CUSTOMER SAFETY RESPONSIBILITIES Page 4 - 5 PRODUCT OVERVIEW Page 6 SPECIFICATIONS Page 6 SPECIAL CONDITIONS FOR SAFE USE Page 6 DIMENSIONS Page 7 INSTALLATION Page 7 STANDARD WIRING Page 9 SENSOR PLACEMENT DIAGRAMS Page 11 - Determining Left & Right Side of Bucket Elevator Page 11 - Typical Mounting Positions on a Bucket Elevator Page 12... -
Page 4: Customer Safety Responsibilities
The proper installation and maintenance of all our products is the responsibility of the user unless you have asked 4B to perform these tasks. B. All installation and wiring must be in accordance with Local and National Electrical Codes and other standards applicable to your industry. - Page 5 3. SELECT A QUALIFIED AND COMPETENT INSTALLER Correct installation of the product is important for safety and performance. If you have not asked 4B to perform the installation of the unit on your behalf, it is critical for the safety of your operation and those who may perform work on your operation that you select a qualified and competent electrical installer to undertake the installation.
-
Page 6: Product Overview
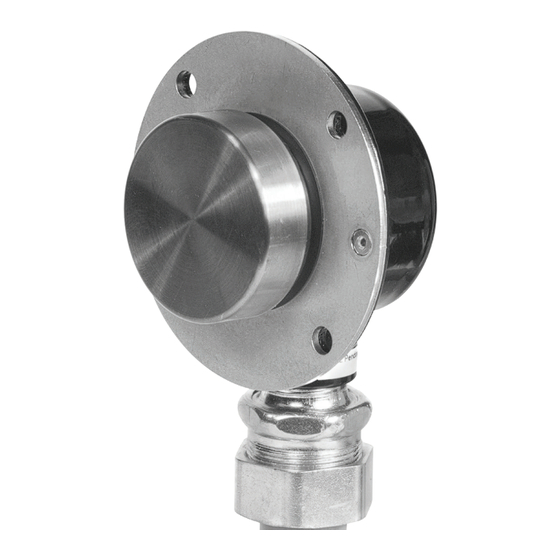
• Always lockout and tagout the machine prior to installation PRODUCT OVERVIEW The Touchswitch™ is an electronic limit switch. When a belt misaligns or a pulley moves over and contacts the sensor, the built in solid-state electronic circuitry detects the lateral force of the belt or pulley and activates a voltage free relay contact. -
Page 7: Dimensions
The Touchswitch™ hole should be cut into the housing with a 57mm diameter hole saw (Image A), centered on the edge of the belt. The hole should be cleaned and de-burred to avoid the Touchswitch™ puck binding and giving false misalignment alarms. You can mount the Touchswitch™ with 2 of the 4 flange holes, provided they are diagonal from one another. - Page 8 Sometimes this is not possible due to an inspection door, X-PAC or other obstruction. In this case, the Touchswitch™ can be mounted on the top or up side of the head pulley. Try to mount Touchswitches so they are accessible from the head section walkway. Be sure to mount Touchswitches directly across from one another.
-
Page 9: Standard Wiring
• Touchswitch™ wiring is low voltage DC. • Use shielded cable and keep separate from high voltage cable. • Never run Touchswitch™ cables in the same conduit as 3-phase motor cables. • Track belts and commission plant prior to installing Touchswitches. - Page 10 4B recommends that the machine shuts down when the belt contacts the Touchswitch. If the machine does not shut down and the belt is allowed to continue to rub against the face of the Touchswitch, the hardened stainless steel sensor puck may wear and the heat generated by the friction may cause the thermal fuse to blow.
-
Page 11: Sensor Placement Diagrams
DETERMINING LEFT & RIGHT SIDE OF BUCKET ELEVATOR: VIEW OF LEFT SIDE VIEW OF RIGHT SIDE NOTE: Left and right sides are determined when facing the direction that the bucket elevator discharges. TOUCHSWITCH™ placement on the left side will mirror the right side. PAGE 11... -
Page 12: Typical Mounting Positions On A Bucket Elevator
When mounting on the head section of a leg or belt conveyor try to catch the belt and the pulley. On a leg mount Touchswitch™ just above the center line of the head shaft on the discharge side of the pulley when possible. - Page 13 When mounting on the head section of a leg or belt conveyor try to catch the belt and the pulley. On a leg mount Touchswitch™ just above the center line of the head shaft on the discharge side of the pulley when possible.
-
Page 14: Typical Mounting Positions On Tail/Boot Section Of Bucket Elevator
THE HIGHEST POINT THAT THE BOOTSHAFT CAN BE ADJUSTED TO. ADDITIONAL TOUCHSWITCH™ CAN BE INSTALLED TO ACCOMMODATE FOR BOOT TAKE-UP. OR A SLOT FOR THE TOUCHSWITCH CAN BE MADE IN THE BOOT CASING SO THAT THE TOUCHSWITCH™ TRAVELS WITH THE BOOT TAKE -UP. Bootshaft... -
Page 15: Typical Mounting Positions On An Open Belt Conveyor
TYPICAL MOUNTING POSITIONS ON AN OPEN BELT CONVEYOR: PAGE 15... -
Page 16: Typical Mounting Positions On An Enclosed Belt Conveyor
TYPICAL MOUNTING POSITIONS ON AN ENCLOSED BELT CONVEYOR: PAGE 16... - Page 17 TYPICAL INSTALLATION PHOTOS Touchswitch Face / Puck Conveyor Belt Touchswitch™ Installed at Drive End of Enclosed Belt Conveyor (Inside View) Touchswitch Mounted to Fabricated Bracket Pulley Touchswitch™ Installed at Tail of Open Belt Conveyor Touchswitch Speed Sensor Bearing Temperature Sensor Touchswitch™...
-
Page 18: Testing & Commissioning
Periodically test the sensor and the system to ensure both are operating correctly. The Touchswitch™ has a built in test knob that allows for quick and easy operation verification without removing the sensor from the mounting hole. The testing procedure is outlined below: 1. -
Page 19: Product Warranty
4B France herein after referred to as 4B to the original purchaser against defects in workmanship or materials under normal use for one (1) year after date of purchase from 4B. Any product determined by 4B at its sole discretion to be defective in material or workmanship and returned to a 4B branch or authorized service location, as 4B designates, shipping costs prepaid, will be, as the exclusive remedy, repaired or replaced at 4B’s option. - Page 20 Fax: +33 (0) 3 22 42 37 33 Tel: +27 (0) 11 708 6114 Tel: +61 (0)7 3216 9365 Fax: +27 (0) 11 708 1654 Fax: +61 (0)7 3219 5837 www.go4b.com Copyright © 2018 4B Group - All Rights Reserved REV050818...


